Whether you’re a brand new Yulio user or perhaps you’re looking for a deep dive into our features, we wanted to welcome you to our Yulio masterclass. In this series, we’ll be spotlighting one of our features to take an in-depth look on how you can best use them and hopefully inspire you in your future Yulio projects.
If you have gone through our 30-day free trial or are a Pro license user, you’re probably very familiar with what a Yulio hotspot is. However, just in case you’re in need of a refresher, a hotspot is simply an interactive trigger point where you can link scenes together or share more information to further enrich your immersive experience.
Navigation Hotspots are perhaps the most used feature on Yulio. Both versatile and easy to use, Navigation Hotspots are often the foundation of many Yulio projects, giving users the ability to tie scenes together in order to form a cohesive and complete VR project. Here’s what you’ll need to prepare before adding these hotspots into your scenes.
Get Your Project Ready
Before we get started, you will need to get your scenes prepped and ready for Yulio. Here are the first 3 steps you need to take.
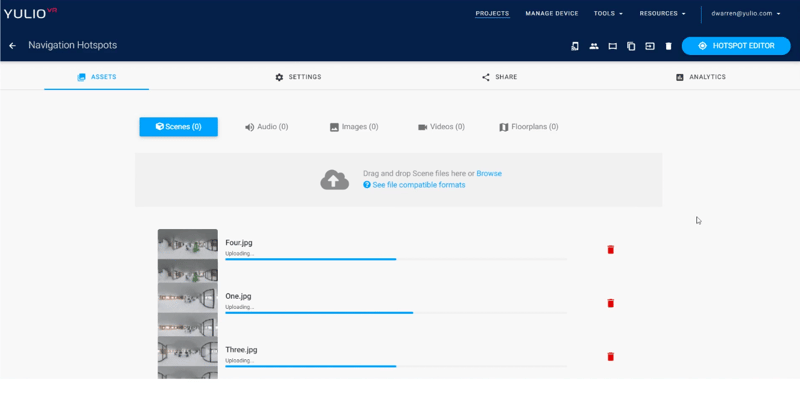
Upload your scenes
In order to add Navigation Hotspots to your projects, you will need at least 2 scenes. Your scenes can either be rendered images from a CAD or 3D modeling program or 360 photos - just make sure it’s compatible with the Yulio file formats. You can click here for more information about file formats that are compatible with Yulio or here to get redirected to our Yulio CAD plugins page. Our team has created free plugins for a number of CAD programs to help you create compatible files quickly and easily. All it takes is a few clicks, and you’re ready to upload your scenes.
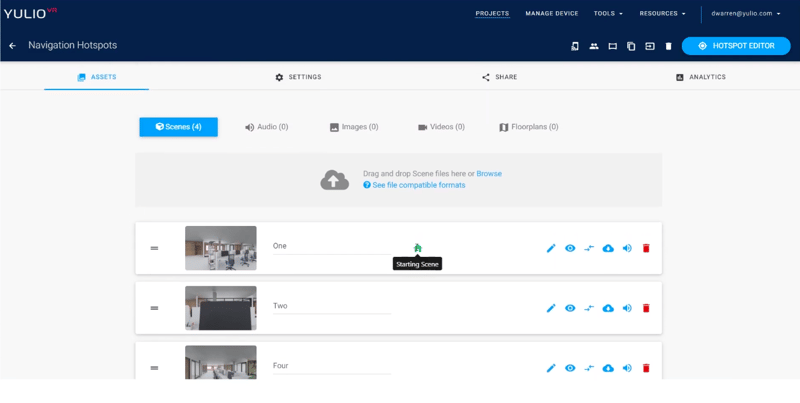
Rearrange your scenes
After uploading your scenes to Yulio, it’s important that you remember to sort your scenes accordingly. If you have a scene specifically rendered as the opening scene, make sure it’s at the top of the list. By doing so, you would have assigned that scene to be your “Starting Scene” - you’ll know which one is the starting scene as there’s a small green house icon to indicate it. After doing so, arrange your scenes in the order that makes the most sense for you and to help you stay organized when building your VR project.
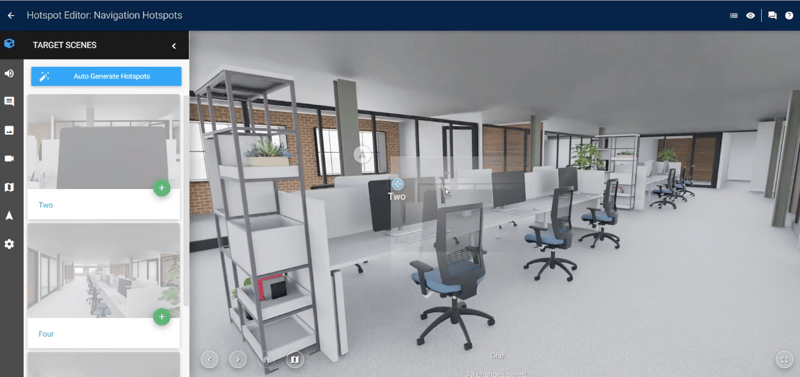
Drag and drop
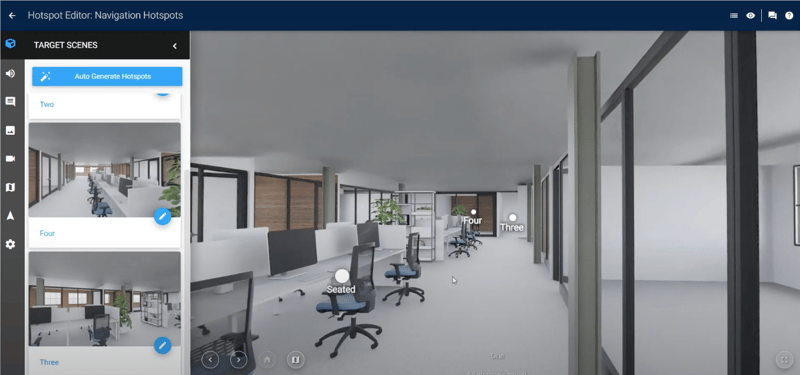
Finally, you’re ready to add your Navigation Hotspots! The easiest way to do it is to drag and drop the hotspots to where you would like them. One question we often get and would like to note is “am I missing one of the scenes I uploaded?”. The short answer is no. When you’re in the hotspot editor, you’re currently standing in the 4th “missing” scene, and you cannot navigate to the place you’re already in. So link up the rest of your scenes and start building out the rest of your VR project.
Tips to Remember
Adding and using Navigation Hotspots are easy and quite intuitive to use. However, we wanted to also share some tips from our team and real Yulio users - hopefully, you’ll find them helpful.
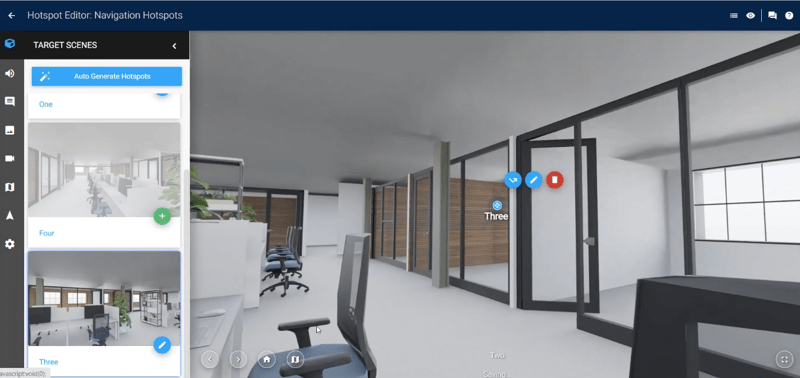
Add Hotspots to your Other Scenes
One tip from Dana Warren, our Client Success Manager, shares with all of our users is after adding Navigation Hotspots in your starting scene, remember to add reciprocating hotspots to all the scenes. You always want to get back to where you came from to make your VR experience as smooth and continuous as possible. So if you have a total of 4 scenes, remember to go to the other 3 scenes and add the corresponding hotspots.
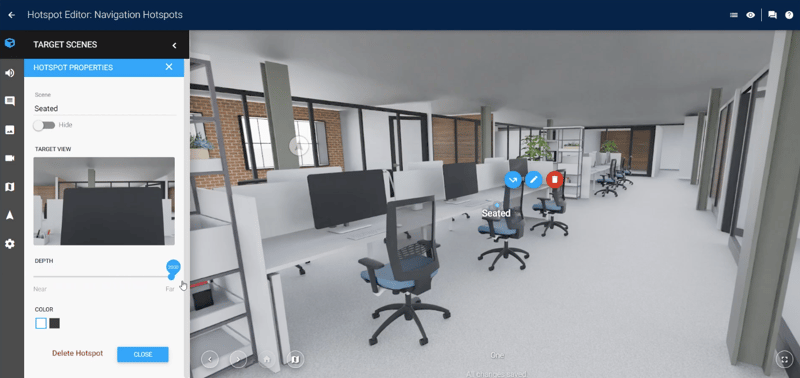
Change Depth to Hotspots
You’ll see when adding Navigation Hotspots a slider that changes the depth of the hotspot. Contrary to popular belief, the slider doesn’t just make your hotspots smaller or bigger - it actually moves them closer or further in relation to other hotspots in your scene. This is most noticeable when you’re viewing your project in a VR environment, giving greater intensity and dimension to your scenes - definitely don’t skip out on this step.
Hotspot Labels
One step we often see our users forget to take note of is to either rename or hide the hotspot labels. While this is mostly a housekeeping tip, small details can oftentimes make a much bigger significance than we could anticipate. Names like “Photo 002” or “Render 1” can shatter the experience and make your project seem less professional or slightly rushed. So opt to either take out labels for your hotspots completely or name them accordingly. One tip that Dana also shared with us is when naming your hotspots, try to use shorter labels as it’ll look better when viewing your project in VR.
Change it Up!
Something we like to say at Yulio is that when it comes to VR, the biggest limit is your imagination. So remember to switch it up in your projects and get creative. If your project allows, try showcasing your space from 3 different perspectives, such as a seated angle, a standing perspective, and one from the floor above. All you have to do is change the height in your CAD program and place your hotspots in the corresponding positions. This can make your projects much more engaging while giving greater context and information to a client or prospect exploring your VR space.
Set your Default Starting View
And lastly, don’t forget to adjust your Default Starting View. This feature is located in the hotspot editor bar and will allow you to adjust your views to show off the money shot in each scene. We created this feature when we saw many of our users going back to their CAD program to adjust, rerender, and then reupload their scenes to Yulio. With Default Starting View, all you have to do is drag to your desired view and click Apply, saving you from going back and forth in order to get your views just right.
Top Tip: Some clients have opted to put their Navigation Hotspots on the floor of their scenes to lessen any distractions. It’s ultimately up to you on how you want to utilize this feature; do what fits best with your goals and needs.
And there you go! All Yulio projects are saved automatically so you never have to worry whether your work is saved or not. Just take a final check through all your scenes before sending it off to clients.
We hope this Yulio masterclass on Navigation Hotspots was helpful and inspired you to try other ways to use these hotspots in your projects. If you’re a visual learner, you can find a video version of this post on our YouTube channel. You can follow Dana Warren, Yulio’s Client Success Manager, as she adds Navigation Hotspots into a project. For in-depth tutorials on all of our features, head over to our Knowledge Base for user guides and other help articles.