We created our cloud-based rendering Yulio Jump for SketchUp and CET Designer platforms because we saw a concurrent pain point for all commercial design professionals. While rendering images for pitches and presentations is a necessary and inevitable step in every designer’s workflow, the time it takes for your project to finish rendering can either take up half of your day or, especially for large high-quality renders, over two business days. And not only is the process incredibly time-consuming, but it can often interfere with a computer’s performance, making that device unusable for however long.
Cloud rendering for interior design is an efficient alternative to traditional methods, helping designers cut down their rendering time down to just a matter of minutes. And with Yulio Jump, our team was able to render this multi-scene project in under 10 minutes.
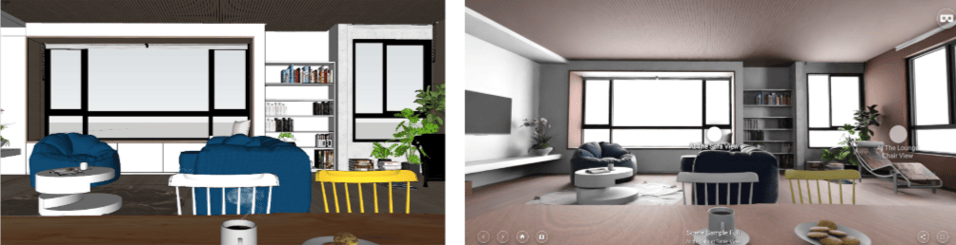
Here's a project we rendered with Yulio Jump for SketchUp - check out the full project here
We know that cloud-based rendering platforms are a game-changer for so many in the commercial design industry that are looking for a high-quality yet quick way to produce content not only ready for your next pitch, but also for your next VR presentation. In today’s blog post, we’ll be sharing our top 10 tips and considerations with using Yulio Jump to help you get the most out of your license.
Let’s dive in!
1. Check you have 4 Walls and a Ceiling
Before you get started with rendering, it’s important to prep and prime your projects for Yulio Jump. We recommend that you render projects that have 4 walls and a ceiling. When you’re creating your projects, think about designing for 360-degrees and Virtual Reality. Having a fully enclosed spaces makes the experience much more realistic, immersive and exceptional for your clients.
2. Create New Perspectives
With Yulio Jump for CET Designer, creating new scenes for your VR experiences is quick and simple. All you have to do is open PhotoLab and add new perspectives by clicking the New button. For Yulio Jump for SketchUp users, set your scenes then hit render with Yulio Jump. This allows you to capture your scene’s “money shot” and give your clients the chance to explore your project from every angle. Plus, it’s an easy way to bulk up your project to include more than just one scene.
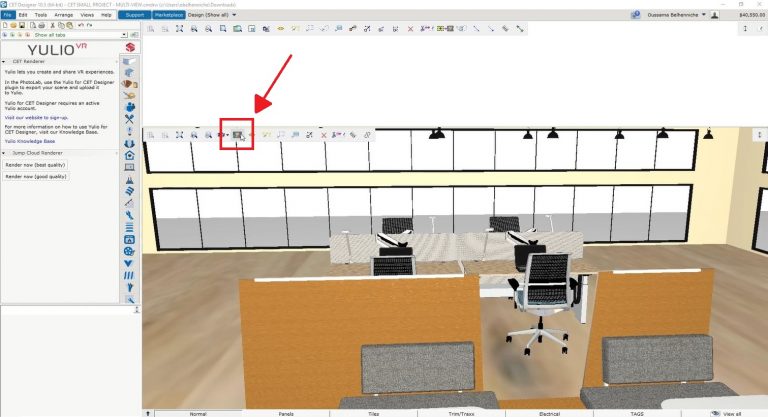
For CET Designer users, click on the PhotoLab icon to set your scenes.
3. Go Beyond a Single Scene
On that note, we generally we recommend that you place at least 2-3 perspectives or scenes around your model. While a single scene can still give your clients an understanding of your space, it can leave a rather limited and stationary feel. Having more than one perspective gives your clients a more representative feel for the space and will help develop an impressive VR walkthrough.
4. Setting the Perfect Height
With every Jump project, we advise all our users to render with the end-user in mind. Generally, we recommend that you set your camera height to a standing height of 5’6” so that your projects can be explored in a more realistic perspective. However, you can always get creative with it and lower the camera height down to a seated position to showcase an office seating solution or a classroom area.
5. Selecting Lighting
In Yulio Jumps current version, you have two lighting models to choose from - Interior or Exterior. The exterior lighting option is more suited for spaces with a lot of windows or where a lot of natural light can enter your model. Interior lighting are for spaces with little to no windows, which will then utilize a special algorithm that combines sunlight with artificial ambient light to render your project. One top tip our Client Success Manager uses often is to test both lighting models on one scene before rendering the project. This helps them see which option looks better for that particular model.
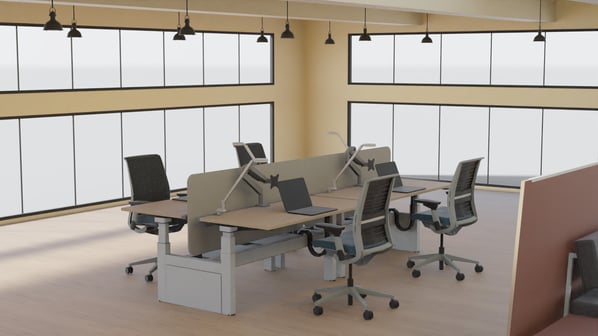
For projects that let in a lot of natural light like this office space redesign, select the Exterior Lighting Model option.
6. Enhance your Projects with 1 Click
For all Jump users, we have added a few additional features to our platform that can help you enhance your project quickly and efficiently.
- Add Floorplan: Yulio Jump will auto-generate a floorplan for you from your CET or SketchUp model
- Add Navigation Hotspots: Yulio Jump will automatically generate navigational hotspots in your VR project
By selecting these two features, you can shave off some of the time it would take to edit your VR project.
7. Add In Tags for Greater Realism
In SketchUp, Jump users can take their project to the next level with Enhanced Material Tags. Our team has formulated 17 tags that you can use to increase photorealism in your renderings, making your project look that much more stunning in VR.
8. Render 360 Panoramas
Don’t forget, with Yulio Jump you can render 360 panoramas to be viewed in VR. To do this, under the “Render With” tab, select “Yulio Jump = VR/360 Panoramas”. This will generate all you need to get started with enhancing your project in Yulio.
9. Create 2D Perspective Renders
Whether it be for a presentation or pitch, you can also create 2D perspective renders with Yulio Jump. While immersive presentations are fantastic for impressing your clients, 2D renderings can be used as thought starters, visibility checks and more. Here are a few ways that can help you get started:
- Creating close up views of areas or items you would like to highlight in the scene
- Overhead shots that would be too disorienting for the end-user in VR
- Showcase a variety of shots from different heights or perspectives
- Views under tables to show cable management or small organizational details
10. Run Tests on your Projects!
And lastly, don’t be afraid to run tests and try out the two lighting models as well as different perspectives or camera placements for your scenes. Our tool is here to help you create high-quality renders, ready for any upcoming project. Start with rendering one scene at a time before you move on to rendering your full project.
We hope you found these tips helpful in getting started creating content for VR and useful in navigating our Yulio Jump platforms! However, if you’re not yet a Yulio Jump user but would like to see our platform in action, click here to speak to someone from our team!
If you would like further guidance on Yulio Jump, head over to our Knowledge Base for all our step-by-step guides. And as always, if you need any further assistance, please feel free to call our support team at +1 (416) 499 2227 or email us at hello@yulio.com - we’d be happy to assist you.


.jpg?width=245&height=150&name=christina-wocintechchat-com-PzAd5XCyFJo-unsplash%20(1).jpg)
%20(1).jpg?width=245&height=150&name=BUSINESS%20READY%20VR%2084%20(3)%20(1).jpg)