Perhaps you’re all too familiar with feeling the sudden pang when a client says “I’m sorry, I just can’t see it”. Not being able to decipher a floor plan, how to read and understand 2D renderings or how each element spatially fits together are just some of the barriers architects and designers face when presenting their vision to prospective clients. While you can prepare a binder filled with photorealistic 2D renderings that should, in theory, provide an accurate representation of what you’re envisioning for a certain project, there are times where it just doesn’t click and your client may choose another firm only because they couldn’t visualize your space clearly.
This is where virtual reality (VR) has provided a much-needed solution to one of the most common points of friction. Rather than merely presenting still images or lifeless physical models of your space, you can virtually invite, guide, and walk your clients through what you have envisioned for their space in a digital representation of your design. The experience is nothing short of spectacular, as presenting with VR allows you to tap into limitless possibilities and gives you a way to showcase spaces that are too large, complex or expensive to model.
So how can you get started with creating your first VR design?
While we have previously covered the various methods on how anyone can get started with creating content for VR, in today’s blog post, we want to zero in on how to design in VR specifically for architects and designers. We know that designers are always looking for innovative ways to take their presentations and pitches to the next level without wasting an inordinate amount of time learning how to navigate new technology or waiting for it to work. So in today’s blog post, we’ll be showing you a streamlined workflow as well as some tips to consider when designing for VR.
.jpg?width=799&name=man-with-headphones-facing-computer-monitor-845451%20(1).jpg)
1. Design your Scene
This goes without saying, but the first step starts with your design. While we won’t be necessarily sharing specific design tips, here are some considerations on how you can best prep your scene for the best immersive experience for your client.
First and foremost is that VR does not and will not hide poor design. The best VR experiences always begin with outstanding high-quality designs, and you can’t hide behind the technology’s “wow factor” to impress or distract your clients. Think of VR like an amplifying projector where it will project what information you have provided as input. For stunning photorealistic designs, VR will take your project and further bring out the most eye-catching qualities to further captivate your audience. However, this same situation works in the opposite scenario. If you don’t think your design is working in 2D, these issues will show up in your VR experience even more.
%20(1).jpg?width=799&name=BUSINESS%20READY%20VR%2063%20(1)%20(1).jpg)
2. Think About the Story
Next, it’s time to think about the story you would like to tell with using virtual reality. The beauty of this platform is that you’re able to present your designs in an almost choreographed performance. You as the designer will have the ability and flexibility to direct how your end viewer will experience your scene. So as the director, it’s time to think about the flow of your experience - here are some questions that may help provide some extra clarity and guide you on this next step.
- What is the beginning, middle and end of your visual story?
- Why did you choose this project to showcase with VR?
- What specific elements you’re hoping to highlight with this technology?
- What path will be most optimal in understanding your design?
- Are there any parts of your design that you foresee will be difficult to understand with floor plans or line drawings?
- Where can you place enhancement elements to provide better context to your project?
%20(1).jpeg?width=801&name=BUSINESS%20READY%20VR%2084%20(3)%20(1).jpeg)
3. Double Check Small Details
After finalizing your VR storyboard, it’s time to check a few small but important details. Like we said in the first step, virtual reality is like an amplifying projector where small details will show even more in the immersive format. So it is worth spending the time and effort double-checking small details in order to host the best possible and most realistic VR experience for your clients.
Here’s a checklist of places to circle back before rendering your project:
Look up, down and all around - in VR you’re not just looking at a static image, users can turn their heads to see another view. Make sure there are no blank spots in your project that will shatter the VR illusion.
Set your camera height to 5’4”-5’6” - this is the average height in North America, and since your audience will be experiencing your project in real-world scale, your user needs to feel like they’re in the project. If the camera height is set so high where you’re towering over on the verge of becoming a birds-eye view, this unrealistic experience will also make the VR project less realistic.
Check your lighting - We recommend you try manipulating the shadow rays and light multiplier controls, and adjust them incrementally as you check your design. Our designers set their shadow rays at 100, then render, and then adjust them or the light multipliers by 0.1, 0.2 etc. until they have the desired effect.
Add texture - Use the largest swatch that you can and understand the implications of rotating it - if it’s wood grain or natural stone etc. rotating the swatch can create harsh lines that will be more noticeable in VR. If you’re rendering with Yulio Jump for SketchUp, Yulio’s cloud-based rendering platform, don’t forget to add Enhanced Material tags to further enhance your project.
4. Render
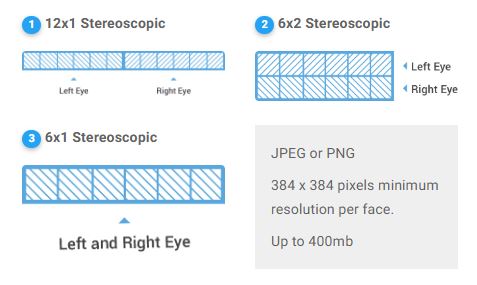
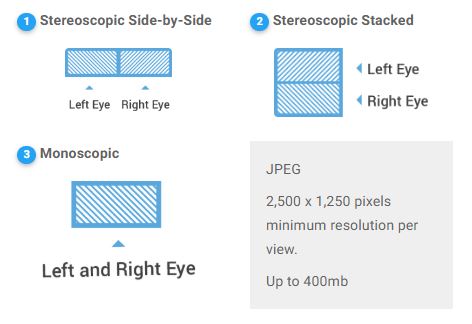
Now when it comes to rendering your project to be viewed in VR, you will need to convert your file into a compatible format. Our Yulio platform uses stereoscopic or monoscopic cubemaps to facilitate VR experiences. The easiest way to create the necessary source files is to use one of the provided Yulio CAD plugins for 3DS Max, Rhino, SketchUp or CET Designer. For all other CAD programs, as long as they have the ability to natively create a cubemap compatible with Yulio, you are good to go. If you wish to provide your own cubemap source files they will need to be formatted in one of the following ways:
Option 1: Stereoscopic & Monoscopic Cubemaps
Option 2: Equirectangular Images
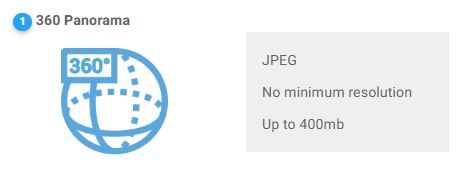
Option 3: Spherical Panoramas (360 Photos)
However, if you’re rendering with Yulio Jump for SketchUp or CET, our platform will automatically create a project that will be ready to be viewed in your Yulio account. All you have to do to access your project is to click View in Yulio and you’ll be redirected to your account.
And That’s It!
Don’t be surprised that we have only outlined 4 steps because it really is that simple. Unfortunately, there seems to be a common misconception floating around that creating content for VR is complicated and time-consuming to learn. This cannot be further from the truth. You’ll notice that much of the steps we have outlined will neither be incredibly disruptive to a designer’s workflow nor require any extra training to navigate this content creation process - it truly is simple and quick to transform your flat projects into stunning explorable experiences. So with its incredible list of benefits and how simple it is to create these experiences, if you have yet to incorporate VR into your workflow, we’ll conclude this post with one final question:
What are you waiting for?
We hope that this guide was helpful in getting you started with how to design in VR. For our in-depth guide on How to Design in VR - click here to access our downloadable guide and checklist. For more tips on pitching architectural designs in-person or remotely, read last week’s blog post here.