We’re back with another Yulio Quick Tips where we’ll be taking a deep dive into how you can utilize Yulio and our features to its fullest potential.
Yulio was created to be first and foremost a powerful presentation tool for anyone who uses images to tell their story in greater fidelity with less ambiguity. Over the years, we have seen numerous industries like architecture, interior design and even art galleries adopt the technology to breathe life into their designs and help clients visualize and instantly understand their proposals and design intent. The best part is getting started is simple and the platform is flexible and built to fit your needs. So whether you have clients who may still be working from home or your first scheduled in-person meeting since the pandemic, you can use Yulio in all presentation circumstances.
But in order to get your platform as well as your projects in tip-top shape for your (virtual) meetings, here are a few steps and tips you should take in preparation.
1. Double Check your Project
While this may seem self-explanatory, it’s important to take the time to go through your project one last time or ask a team member to double-check your hotspots to make sure everything is ready to go.
Here’s a brief checklist of what you should look for in your projects:
Your Project
- Don’t forget to rename your project. The name will auto-populate and can sometimes look really random. While this is a small detail, it can be really distracting or seem unprofessional if the title doesn’t look right. Changing the name will take not even a minute and will tie your whole experience together.
- Check if your default starting views are all ready to go, especially in your opening scene. This is your “money shot” and the first thing your viewers will see entering into your project. No longer will you need to re-render your projects for the perfect shot, you can quickly change it with our Default Starting View feature.
- If you’re using the LiveChat feature, test it out and ensure that it’s connected to your team. You definitely don’t want to miss out on any opportunities to connect with your clients or answer any questions they may have.
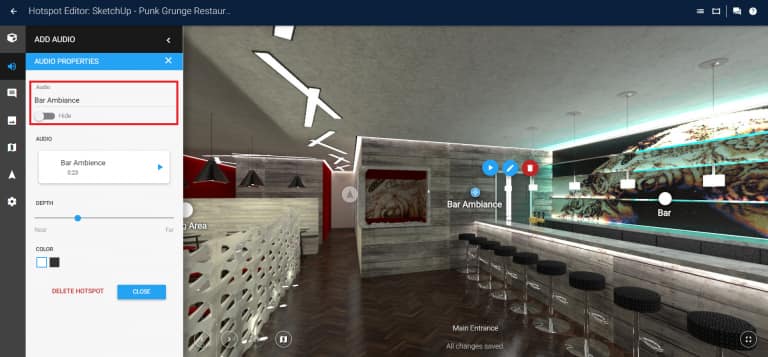
Hotspots
- Ensure you can see all of your hotspots clearly. Yulio has a couple of color customization options you can choose from. So if your space is particularly white, you should consider selecting black hotspots to make sure your clients can clearly see them.
- Double-check the depth slider. The slider doesn’t just make icons larger or smaller - it actually moves the hotspot closer or farther away from the viewer. This adds to the immersive experience.
- Make sure each scene is linked together correctly. Especially with larger projects, it can be hard to keep track of which scene links to where. So click around and make sure each hotspot goes where you want it to go.
- Remember to label your hotspots appropriately. Especially for hotspots like audio where the label will appear as the name of your audio file by default, double-check that it is customized to your specific project.
- Click on your External Links and check if the links go to the intended site and to make sure the links aren’t broken.
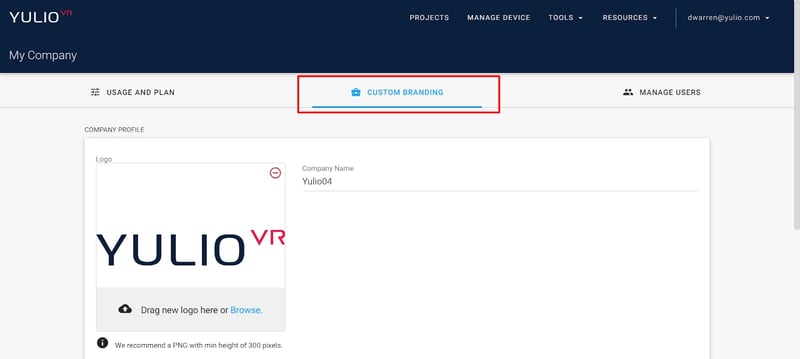
2. Add Your Logo
With our Custom Branding feature, add in the logo of your company or organization to your VR projects. This feature appears at the beginning of every VR project, flashing a logo for just a few brief seconds to introduce viewers to your project.
All you have to do is log into your Yulio account and click on your email in the right corner to open the menu. From there, head to Company Settings and click on the Custom Branding tab in the middle.
Here are the viewer logo requirements:
- File must be PNG
- File size less than 75 KB
- Resolution less than 1024×1024
- Recommended height: 300 pixels
And if you have recently changed your logo, you can remove or replace it at any time. Once you have enabled this feature, we will update all links and VR projects created will have your company logo.
3. Customize Headset Gallery
And finally, customize your headset gallery. Our Custom Lobby feature gives you the ability to change the environment you are in while viewing your headset gallery projects on a VR headset or mobile. So if you have any scenes, especially branded ones, you can now make it the background of your portfolio.
To change your lobby, go to Company Settings and click on the Custom Branding tab just like you would upload your logo. Scroll down to Company Lobby and select Change Lobby.
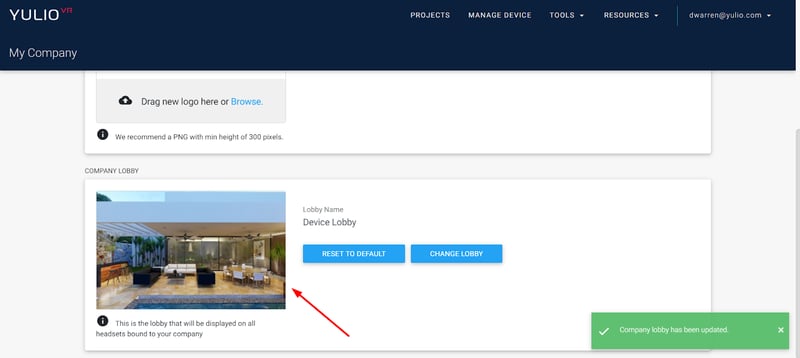
From there, select the project you would like to make your background. One tip we recommend is if the scene is already in your Yulio account, make a copy of that project and renaming it to “Device Lobby”. This will make sure there is no confusion across your team and no one edits the custom lobby by accident.
And that’s it! In all Yulio accounts, the current default is a plain neutral brick gallery wall, so we definitely recommend switching it up to something more on-brand. And keep in mind that you get 1 custom lobber per account, so choose one that is fairly generic and will work with all of your projects.
One final pro tip is to remember the simpler the scene, the better. Busy backgrounds can be distracting and your projects may get lost.
We hope that these tips were helpful in helping you get your projects ready for your next presentation. If you’re in need of a full step-by-step guide on all our features, head over to our Knowledge Base. However, if you need further support, feel free to contact us at hello@yulio.com or reach us at our support line at +1 (416) 499-2227.


_edited.jpg?width=245&height=150&name=BUSINESS-READY-VR-46-3%20(1)_edited.jpg)